Showing posts with label terrain. Show all posts

Sunday, January 20, 2019

Walmington on Bromley End, Bloodford - Homes for the Home Guard

As I slowly move through my lead pile of things Home Guard related, the realization set in that I would need terrain and a fair bit of it if I wanted to replicate Dad's Army, Went the Day Well or The Eagle Has Landed. I toyed with making up buildings out of foam core and other materials but practically, that wasn't a realistic option. With some Christmas money in hand, I went shopping. There are many good manufacturers out there with some very nice products in 28mm / 1/56. Some of the resin offerings were beautiful but expensive, and for many companies, their UK styled offerings were focused on terraced housing.

I decided to go with Sarissa primarily because of their very generous shipping terms and because they ship Royal Mail. (As mentioned in a previous post, courier companies like to gouge Canadians for customs fees). The order was placed and a few weeks later, my order arrived in my mailbox. It came in two separate packages, both properly marked as to contents and value and with no import fees payable - a double bonus.

First up is the L016 Stone Cottage.  This is  a pretty little kit with double walls allowing for the outer wall to lean in - see below and for prototypically thick windows and doors. The interior fireplace and flagged floor was an unexpected add on. A reasonable amount of stone detail is laser etched into the MDF but the effect was still too flat for my liking. At various points in the assembly, I used my Dremel tool to deepen the lines and add more texture. The material used by Sarissa is thick enough and robust enough that I was able to significantly improve the appearance especially around the chimney. I used a very small ball cutter to deepen the lines, followed by a grinding point to round the edges and a wire wheel to soften the effect over all. As always when working on MDF, proper breathing  protection against the dust is a must.


Godwin's Cottage

End view


Next is the N005 Small Shop. A basic two level building with removable roof and first floor, it is a great addition to the high street.
Sinistre and Sons Dry Goods
 The astute among you will notice that the front door and and window are reversed compared to the official version shown in the link above. This was intentional. Sarissa uses several standard sized components across different models in their ranges. On opening the shop flat pack, I was delighted to see that it included a wall section with a rather pretty arched door and window. Rather than use this at the back of the shop, I swapped it out with a standard wall and window section from the one of  the single story houses below. To keep the front and back doors in opposing corners, I reversed the shop window and put the door on the left. I like that the  replacement wall gives a barred window effect for what would be the shop stock room.


Anti-theft protection around the back


Which brings us to a pair of  N021 Single Story Houses. First is the stock version:

Foxglove Cottage
A simple little building that will make a good hiding place for a Vickers or an angry housewife with a brace of Molotovs. And the modified version:

The Irises


Swapping the walls gives me two versions of the same building while breaking up some of the same-iness common to MDF structures.


Last of the buildings is the N009 Small House. Another functional building that will blend in on the high street or act alone as a larger farmhouse.

Biggles' Farm

The last piece from Sarissa is the N048 Stone Bridge - Double Arch shown here with a Die Waffenkammer Neubaufahrzeug on its way to put the jackboot to an unsuspecting bucolic English village.

Bloodnok Bridge

It comes in several versions with up to three arches. I went with the double arch version for maximum flexibility. The ends and middle seem to be very stable as is, but I may add rare earth magnets to lock them together if required.  Size wise it is probably a little over scale width, but that is a positive for us wargamers.

With Warlord Sherman

The Sarissa products are quite a bit smaller than my Charlie Foxtrot pub but I don't think that will be a problem. The pub is a large piece for any table.

The Pub Next Door

 Laid out, I think I now have enough buildings for a rather exciting urban fight.

We are the only Germans in the Village!

Overall, I am happy with the results. The price was good and I was able to get some extra variety out of my purchase. There is a lot more work to do on painting, finishing and the roofs, but they're fine for play testing scenarios as is.

Sunday, March 27, 2016

Analogue Painting Challenge - the final tally

As I mentioned a long while back, I decided to participate in the Analogue Painting Challenge for 2015-16.  I set myself a goal of 500 points and wound up producing 675. I am quite proud of this and very much appreciate the kick in the pants it gave me to complete my Space 1889 painting.

Apart form Space 1889 and general VSF, I also managed to fit in some terrain for Chain of Command and a couple of vehicles for grunts.

The images following are a visual record of my production.
Lead

More Lead


Martian and Askari Artillery

Askari and more Artillery

Crocean Heavy Lancers

Hill Martian Lights

Guild Rifles

Hill Martian Light Cavalry


Grave Digger


The Mechanic

Gentleman


Lady in Green


Dapper Gent


Street tough


Not Preston Manning


Gentleman on the move


Anarchist Sniper

Barbed Wire

More Wire

The Black Beaks - Askari mounted


Hover APC Malta Pattern I

Hover APC Malta Pattern II

At times it took some pushing but on the whole, a good experience.  Thanks to Curt for running it.

Thursday, August 6, 2015

New Terrain for Space 1889


Just a quick post. Life has been crazy busy since the Spring and is even more so now Canada is in election mode. I was however able to put together a bit of terrain for Space 1889 and Gruntz:


The spiky things are the seed pods of Fuller's Teasel, a roadside weed that used to be used to fluff up wool blankets. Add some card bases a little sand and some flock (dyed tea leaves) an I have a dozen or so spiky Martian bushes for Oh'ktava'an's troops to hide behind.

Tuesday, July 1, 2014

More painting and some conversions

It was hot and humid Canada Day but I managed to get quite a bit of time in the man cave while the missus helped the offspring with their post school year room clean up.

A while back, I unearthed a pack of British colonial infantry. As I have quite a few in redcoats already and some more in the pile destined to be clad in khaki, I decided to do this bunch as ersatz Royal Marine Light Infantry.  They aren't quite right in some details but only those a purist would notice and they are destined for VSF so all historical objections are moot.

RMLI (or close enough to pass on the table)


The other project for the day was a couple of conversions. My fallschirmjäger were a little light in the support department so for my birthday I placed an order with Wargames Foundry for some reinforcements. This created a bit of a quandary. One figure in the  heavy weapons pack gives you a choice between slung MG 34 or Panzerbüchse 39 but not both. I needed the MG 34 for certain platoon organizations but I really, really wanted the ATR for use in early war operations.  I wonder why? My Foundry order was large enough to qualify for an extra pack so with some trepidation I broke out the razor saw and cyanoacrylate.

FJ Supports (and a couple of Martians)
The centre un-primed figure running with the grenade was my sacrifice starting point.  The flanking figures are the result. Pretty good I think and useful for punching holes in any light armour sniffing around the green fields of Eakring.  I didn't quite have the nerve to remove the slung Kar 98 but FJ are supposed to be beefy lads so they can carry both.  The double based figures on the right are a sniper team. The figures are stock. The sniper scope being a section of  1/72 Macross VF-1 Valkyrie landing gear strut from the bits box.

My second band of High Martians got a long awaited dip and I even managed to dye some tea leaves for home made flock. I didn't quite have the nerve to appropriate the food processor to turn a bag of foam chips into ground foam - maybe next time.

A very productive and satisfying day off.

edit: I really do need a camera with decent macro capability.

Tuesday, April 30, 2013

The Push - Part 1

As mentioned previously, I will be running an 1889 game at Cangames this year. With school work out of the way and things at work calming down a bit, I was able to get going on terrain this past weekend.
Dollar Store Goodies
An earlier trip to the Dollar Store gave me some of the materials to work with. Woodlands Scenics it isn't but the price can't be beat. One note: try to buy all you need of a certain item in one go - you may never see the exact same item in stock again.    

Red Weed
Plastic plants are always useful. As you can see above, most are made up of smaller sprigs that can be separated out. Be sure to wash all plastics well to remove any mould release agent especially if you will be painting or dry brushing later.


Stacked up ready to go
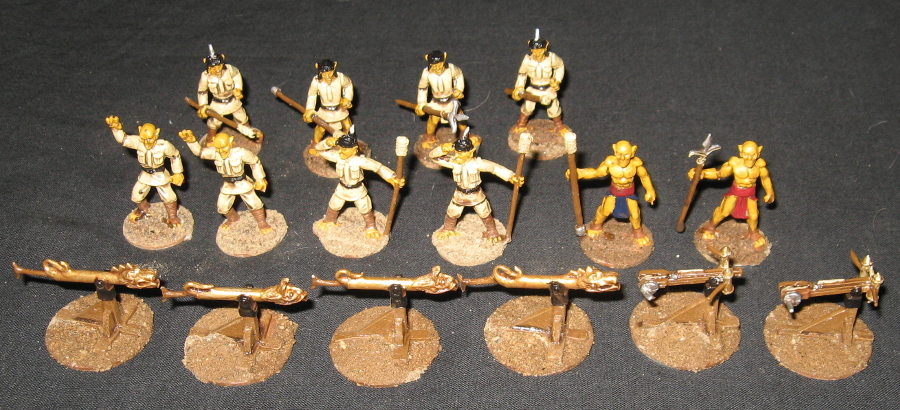
My rifles still needed some touch ups and I had purchased some guns to even the odds for the Martians. Saturday was pretty grey wet out so painting was the order of the day.


The bird houses were slated to become a Martian swamp village. Weapon ranges are rather long so the Martians need all the cover they can get. The first step was to give them a good coat of gesso.

Doors
The next step was to add some doors cut out of recycled three ring binder cover card and cereal boxes.

Garish....
 The back story material for Space 1889 talks about the Martians ability to fuse sand to create their canals. I thought that the same technology would be used in house construction. Canada is now, or rather was home to a rather ugly form of pottery known as Blue Mountain. I used that as a inspiration for my swamp Martian huts.  While Blue Mountain primarily used a subdued dark green, I went with brighter colours. I am going to rationalize this by saying that Space 1889 can quickly devolve into "North West Frontier in Space".  I wanted to mix some "strange" into it so that the players know this is not just India on another planet. 


Ready to move in.
Sunday was bright and sunny so construction moved outside. The various bits of plastic greenery were cut down, reconfigured and applied as thatching to the huts to produce the rather fetching trio above. Bits of ceramic fruit and silk flowers were used to add a feminine touch.... not sure why exactly but there you go.

Hedges
Other bits of  greenery were hot glued onto more recycled binder card to produce a series of hedges for the Martians to hide behind.

Cheap Walls
A final project for the day was to make up a series of broken walls out of recycled Styrofoam scrounged by a friend on garbage day. I used the beaded variety because it was what I had and the beads give a rubble like texture to the breaks. It is not particularly robust so for longer term use I would look for insulation board and possibly even add an MDF base for strength.

Next up will probably be the temple complex. Work is also ongoing on the unit cards and quick reference sheets.  When does a hobby turn into more work than your actual work?

Sunday, September 30, 2012

Kraag for a King - part three

This is part three of a multi-part series on the building of a mountain fortress or Kraag for the (soon to be) Great Martian King Antevaxx. The previous part, two point five, is here and the first article in the series is here.

 Where we left off:


I decided to live with the blobbiness as it gives an organic look much like a mud dauber wasp nest. I needed some household repair items so while at the hardware store, I picked up another can of foam and some primer. I built on what was already done and ended up with the picture above. 

Note that this is low expansion foam designed to fill gaps of about an inch / 2.5 cm. There are higher expansion foams available but I can't see using them for this kind of project - they would expand far too much. I had some foam left in the can so used it to make some random shapes and other terrain bits. I'll cover those another time.

So with the base complete, I gave the whole thing a shot of primer. Expanding foams can be very sensitive to UV light and will decompose into a crumbly mess. Given the pallor of the average gamer (myself included) UV exposure should not be a problem but one never knows. The primer I used was the same enamel based one I use for metal figures but the store was out of grey and I had to buy white.  After application, the primer stayed tacky for a good 24 hours. I was a bit concerned that being oil based it was eating the foam but in the end it dried properly. I have since used the primer on metal figures with the same result. It seems this particular batch just takes a while to dry. For future foam projects, I will look for an acrylic primer just to be sure.

I was happy with the general form of the Kraag, but the texture was too smooth for my liking. In the space 1889 canon, Mars is depicted as having once had a high level of technology but now is slowly degrading into barbarism. One of the technologies lost was the ability to fuse sand and soil into a strong glass like building material. So, building off the blobbiness of the foam, I wondered what such a material would look like after being blasted by wind driven sand and dust and studied various images of weathered glass and ceramic. Or - I needed some cheap texturing materials for my minis and figured I would use the same on the Kraag. I decided to go with a sand based texture and again while picking up home repair supplies, grabbed 66 lbs / 30 kg of sand for about $6.  

For the first pass, I used a brush to apply a 50% mix of PVA and water to an area of the foam. Then I spread sand over the wetted area and shook off the excess. This process was repeated until the whole Kraag was covered.

As you can see the results were patchy but promising. The PVA mix tends to run off the high spots giving nothing for the sand to stick to.  I let this first phase dry while I had a think. Digging around the gardening supplies, I found an old plant sprayer. I loaded this up with the PVA mix and went back over the Kraag. Then I laid down more sand, the end results shown in the pictures below.

The Big Picture
Up Close
The spray method worked much better. There are still a few bare spots but I think I will leave these as less worn areas. The surface is a little fragile yet and may need another application of PVA. Be sure to clean the sprayer well after use or the internal gubbins will be glued solid by the PVA. I am very happy with the work so far and Antevaxx will be by to inspect once everything has dried up. The next step will be to apply some colour washes over the sand.


Sunday, September 2, 2012

Kraag for a King - part 2.5


This is part two point five of a multi-part series on the building of a mountain fortress or Kraag for the (soon to be) Great Martian King Antevaxx. Part two is here and the first article in the series is here.

Just a quick update. I wasn't going to do this part right away because I didn't think I had any spray foam. However, tucked away on the back of the shelf was a partially used and now expired can from some renovation work two years ago.  A little work to clean out the nozzle and I started to play:


The effect is more Castle Greyskull than I hoped and more foam is required.  I am thinking about using a knife to cut away the blobbiness and give it a more angular look. Whatever the rock profile, I will be covering it with sand to give a rougher finish.

More to follow.

Part three is here